Create an A/B testing mock API scenario with Mockoon
Learn how to simulate an A/B testing workflow by assigning visitors to variants, serving different checkout messages, and tracking conversion events with data buckets.
In this tutorial, we will build a small mock API that acts like a marketing experimentation API for a checkout page. Instead of hardcoding one promo message in the frontend, the app calls this API to get the message variant to display.
Usually, this kind of API is consumed by a JavaScript frontend (React, Vue, Angular, etc.) that requests the variant during page load, renders the matching content block, then reports a conversion event when the visitor completes checkout.
The goal is to load a promotional message on the checkout page, randomly assigning visitors to one of two variants:
- Variant A: "Free shipping over $50"
- Variant B: "10% off your first order"
We will simulate three things:
- Assign each visitor to a stable variant.
- Return the matching message to the app.
- Track conversions by variant.
To better match a common real-world setup, this tutorial targets non logged-in visitors. We will use an anonymous visitorId sent as a query parameter instead of a user ID from the request body.
📘 This tutorial uses response rules and data buckets. If you want a quick refresher first, check out our responses and rules and persisting data buckets tutorials.
1. Create a data bucket for the experiment
Create a data bucket named abTests with this content:
Copy{
  "checkoutPromo": {
    "assignments": {},
    "variants": {
      "A": {
        "message": "Free shipping over $50",
        "views": 0,
        "conversions": 0
      },
      "B": {
        "message": "10% off your first order",
        "views": 0,
        "conversions": 0
      }
    }
  }
}
The assignments object will store which visitor got which variant so they keep seeing the same message across calls. It will also allow us to track how many visitors are in each variant. The variants object will store the message for each variant and track the number of views and conversions.
2. Setup the marketing endpoints
Create the following three routes:
GET /marketing/checkout/assignGET /marketing/checkout/promoPOST /marketing/checkout/convert
Route 1: assign a variant
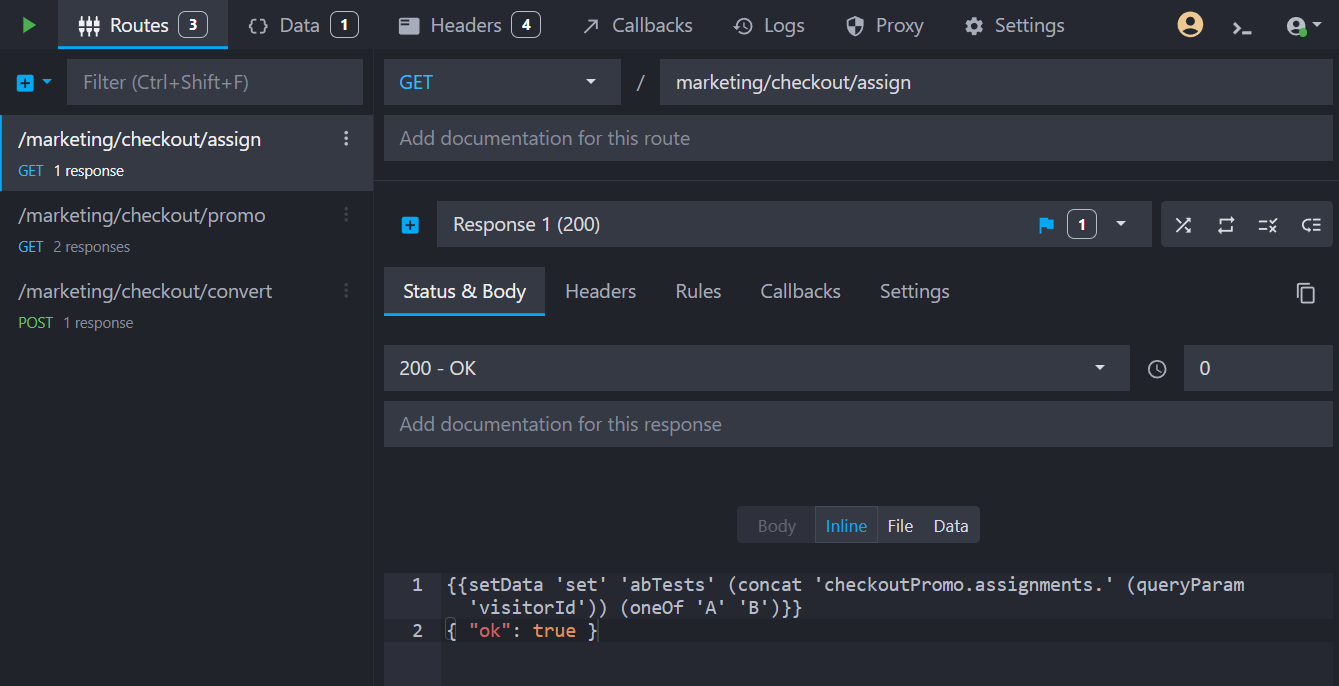
Use this body for GET /marketing/checkout/assign:
Copy{ "ok": true }
This route will store a random variant (A or B) for the current visitorId.
Route 2: return the promo content
Create GET /marketing/checkout/promo with two 200 responses and rules.
The first response's rule should check if the visitor is assigned to variant A:
- Source:
Data bucket - Path:
{{concat 'abTests.checkoutPromo.assignments.' (queryParam 'visitorId')}} - Operator:
Equals - Value:
A

The second response's rule should check if the visitor is assigned to variant B:
- Source:
Data bucket - Path:
{{concat 'abTests.checkoutPromo.assignments.' (queryParam 'visitorId')}} - Operator:
Equals - Value:
B

Use this body for variant A:
Copy{ "variant": "A", "message": "" }
Use this body for variant B:
Copy{ "variant": "B", "message": "" }
Route 3: record a conversion
Create a POST /marketing/checkout/convert route with two 200 responses and the same A/B rules as above. You can use the "Duplicate" route feature and only change the method to POST, the path to /marketing/checkout/convert, and use the following bodies:
For variant A:
Copy{ "recorded": true, "variant": "A" }
For variant B:
Copy{ "recorded": true, "variant": "B" }
At this point, your mock API is ready. Start the environment and continue with the test flow below.
3. Step-by-step test flow
We will use one anonymous visitor id for the whole flow, for example v_1001. You can repeat this process with different visitor ids to simulate multiple visitors.
Step 1. Assign a variant
To assign a variant to the visitor, call the following endpoint, providing the visitorId as a query parameter:
Copycurl "http://localhost:3000/marketing/checkout/assign?visitorId=v_1001"
Expected response:
Copy{ "ok": true }
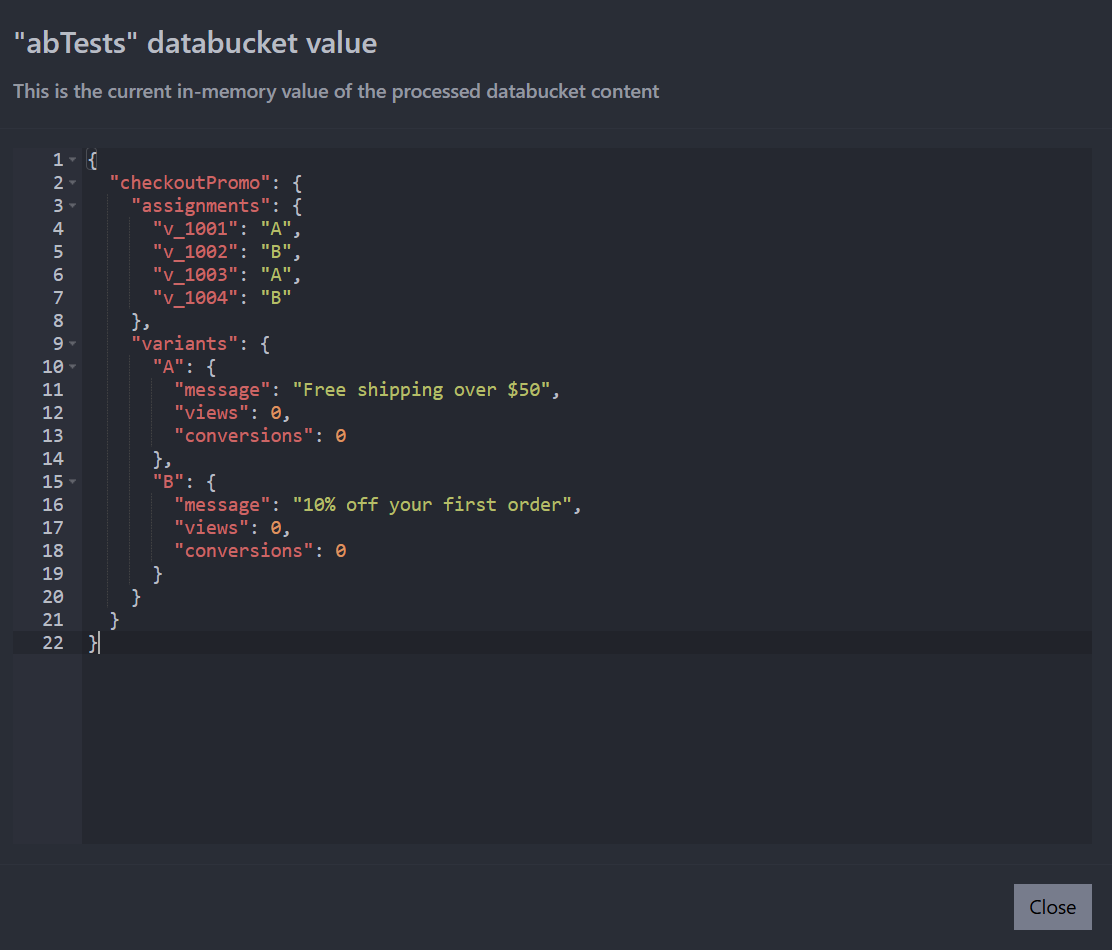
Now open the live value of the abTests bucket and verify that checkoutPromo.assignments.v_1001 exists with either A or B.
You can check the data bucket live view to see the assigned variant, by clicking on the "curly braces" icon at the bottom right of the data bucket view.
Step 2. Request the promo content
The second step is to request the promo content for the assigned variant. Call the following endpoint with the same visitorId:
Copycurl "http://localhost:3000/marketing/checkout/promo?visitorId=v_1001"
Expected response (example if assigned to A):
Copy{ "variant": "A", "message": "Free shipping over $50" }
Expected response (example if assigned to B):
Copy{ "variant": "B", "message": "10% off your first order" }
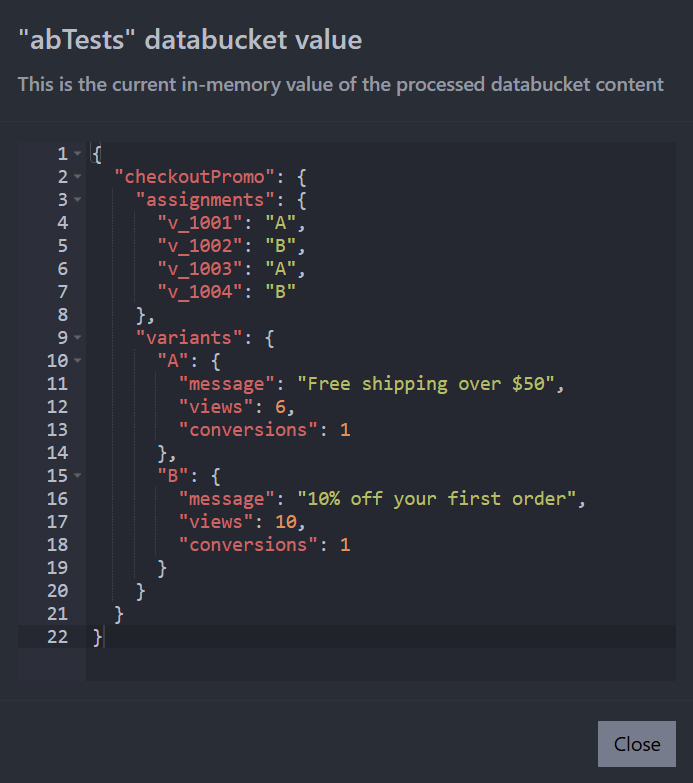
Call the same endpoint a few times with the same visitorId. The returned variant should stay the same, while the corresponding views counter should increase.
Step 3. Record a conversion
Finally, record a conversion for the visitor by calling the following endpoint:
Copycurl -X POST "http://localhost:3000/marketing/checkout/convert?visitorId=v_1001"
Expected response:
Copy{ "recorded": true, "variant": "A" }
Or:
Copy{ "recorded": true, "variant": "B" }
Now verify the matching conversions counter increased for that variant.
You now have a complete, stateful marketing-content API flow: assign a variant, serve variant-specific content, and track performance signals.
Next steps
You can extend this scenario by adding:
- a third variant (
C) with a different message - segment-specific assignment (for example by country or plan)
- automatic fallback to assign a visitor when no assignment exists yet
Download the example environment
You can download the example environment file created for this tutorial or directly open it in Mockoon desktop or CLI:
You might also be interested in these tutorials
Create an A/B testing mock API scenario with Mockoon
Learn how to simulate an A/B testing workflow by assigning visitors to variants, serving different checkout messages, and tracking conversion events with data buckets.
Read moreServe static files with a custom mock endpoint
Learn how to create an endpoint to serve static files (images, fonts, etc.) in your mock API server using Mockoon
Read moreGetting started with Mockoon Cloud
Learn how to get started with Mockoon Cloud, a cloud-based service that allows you collaborate on your mock APIs with your team
Read more