
Use persisting data buckets to share data across routes
Learn how to use Mockoon's data bucket feature to share data across routes and create more advanced scenarios with configuration endpoints
Data buckets were introduced in Mockoon's v1.21.0. They are persisting key-value stores that allow you to reuse data across your routes and body responses. You can reuse the data buckets content wherever the templating helpers are available: headers, body responses, file paths, etc. Although, their state persist between calls, which allow for more realistic behaviors and dynamic configuration of your responses.
What are data buckets?
A data bucket is a key-value store where you can define some string content that you can reuse in multiple route responses.
They are stored at the environment level and generated when the server starts or sometimes after the first call (see below). A data bucket content persists between mock API calls. So, they are the perfect way to create JSON "databases" to be reused in your routes.
Let's see the steps required to create data buckets and use them.
How to create a data bucket?
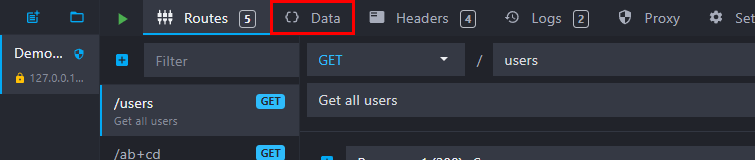
To create a new data bucket, open the Data options by clicking on the tab at the top of the window:
Add a new data bucket by clicking on the "plus" button:
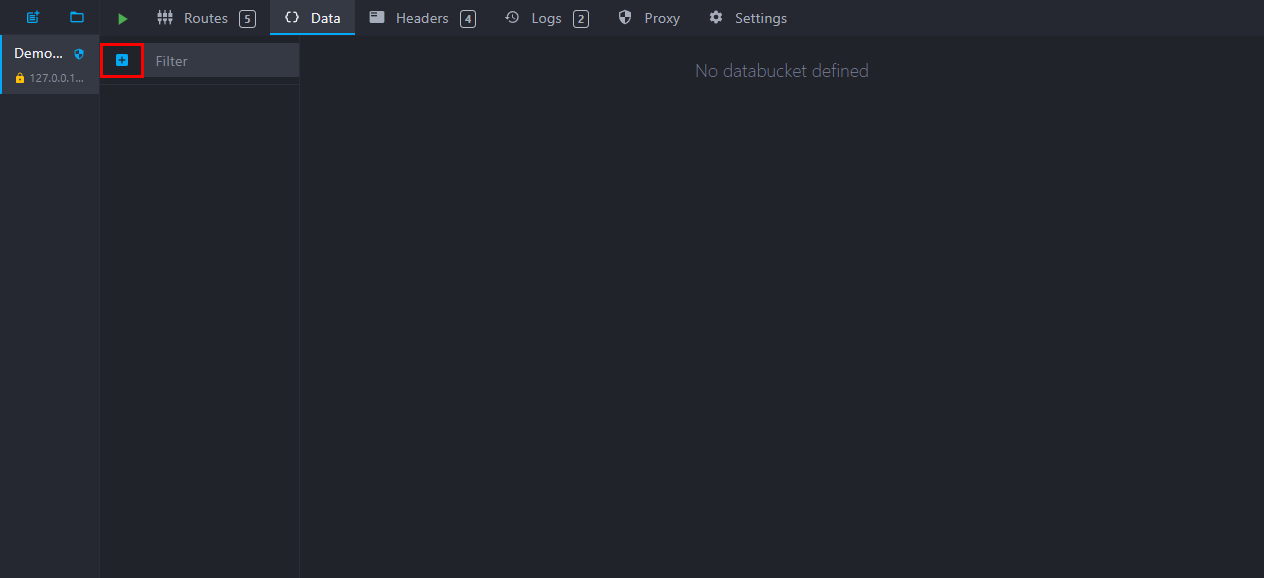
You can personalize your data bucket title and content on the right part of the screen.
Mockoon will automatically attribute a new unique ID to your data bucket. You can use this ID to reference the data using the data helpers (see below). To retrieve a bucket's unique ID, look in the footer under the data bucket content or right-click on a bucket name in the list and click on "Copy ID to clipboard".
Data buckets can contain any type of text content. They also support all of Mockoon's templating helpers.
If your data bucket contains valid JSON, Mockoon will parse it to let you access the JS object, array, primitives, etc., using the templating helpers like (data, each, if, etc.).
🛠️ Use our JSON validator to check if your content is valid JSON.
Data bucket generation time
Mockoon usually generates data buckets when the server starts. Their state will persist until the next restart, so you can always expect the same content to be returned.
For example, if your data bucket contains the following JSON:
Copy{
  "uuid": "{{faker 'string.uuid'}}",
  "firstName": "{{faker 'person.firstName'}}",
  "lastName": "{{faker 'person.lastName'}}"
}
The following content (or a variant of it) will be generated when the server starts, and will never change:
Copy{
  "uuid": "e037ced5-997b-4756-8ae4-cc9c077ef214",
  "firstName": "Jeromy",
  "lastName": "Walker"
}
However, some buckets may not be generated at the server starting time. It is the case when the bucket contains at least one request helper. Request helpers are templating helpers that can only work in the context of an entering request. The required information to correctly evaluate the request helpers are not available when the server starts.
When Mockoon detects that a data bucket contains some request helpers, it will get ignored and won't be generated at server start. During the first request pointing to a route using the data bucket, it will generate it. The data buckets generated at request time are those directly linked to the endpoint response or used through helpers.
This mechanism allows you to use the request helpers and create data bucket configuration routes (see below).
Link a data bucket to a response
You can directly link a data bucket to a route response or even multiple responses. Like this, it's easy to reuse the same content across multiple routes.
To link a data bucket to a route response, click on the "Data" button in the body selector and select your data bucket:
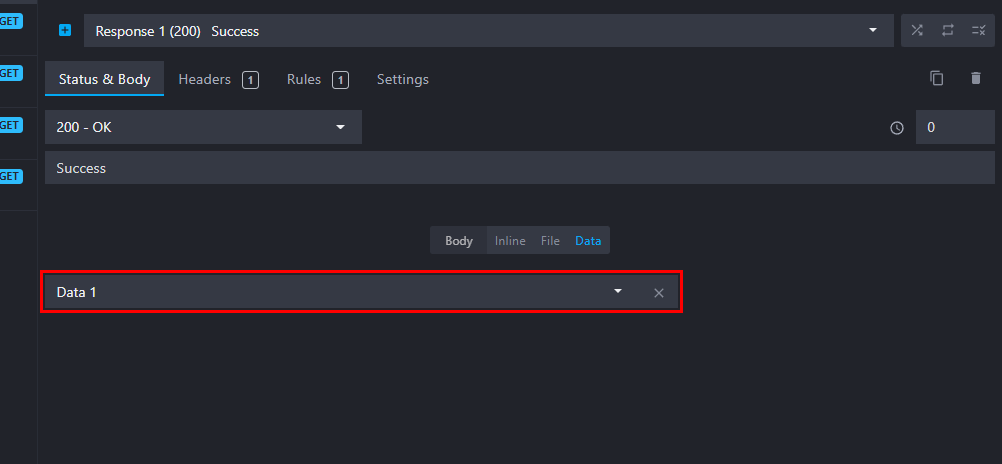
Linking a data bucket to a route response will serve the content of the bucket "as-is".
The Content-Type of the response will still be the one you defined in the header.
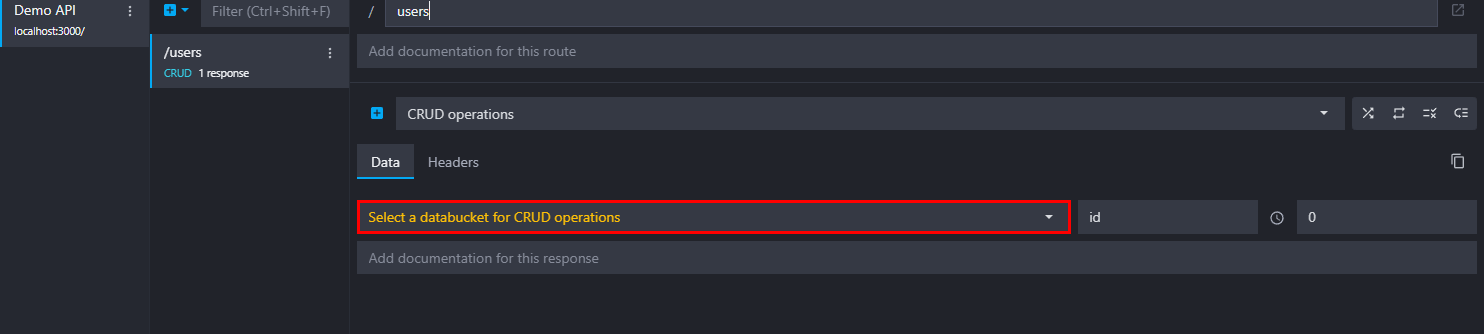
Link a bucket to a CRUD route
When creating a CRUD route you must link a data bucket. This feature allows you to serve and manipulate the data bucket content depending on the CRUD operations. The CRUD routes follow usual REST conventions: GET /resources, POST /resources, PUT /resources/:id, DELETE /resources/:id, etc.
💡Have a look at our dedicated tutorial to learn how CRUD routes interact with the data buckets.
Retrieve a data bucket's content with the templating helpers
Aside from linking data buckets directly to your route responses, you can also use their contents with the two dedicated helpers: data and dataRaw. Head over to their respective documentation to understand how they work.
You can use these helpers anywhere templating is supported: body editor, file path, headers keys, values, etc. It allows you to define small reusable contents, like a file path, an API key, or a header value.
Both helpers support retrieving the data bucket by its unique ID or name. If your data bucket contains valid JSON, the helpers also allow you to retrieve only part of the object using an optional path:
Copy
Let's consider the generated data bucket's content in the previous example:
Copy{
  "uuid": "e037ced5-997b-4756-8ae4-cc9c077ef214",
  "firstName": "Jeromy",
  "lastName": "Walker"
}
Using the data helper like this, {{data 'ID_or_name'}}, would return the full content of the bucket, stringified. While using it with a path, {{data 'ID_or_name' 'uuid'}}, would give you only the uuid key's value inside the object.
You could also use the dataRaw helper to access the underlying JS object parsed from the JSON content. Using the "raw" version of the helper allows you to use arrays, objects, and primitives in combination with other helpers, like repeat, each, oneOf, etc.
Copy[
  {{#each (dataRaw 'abcd' 'obj.array')}}
  {
    "value": "{{this}}"
  }
  {{/each}}
]
Retrieve data buckets content programmatically
You can also manipulate data buckets programmatically using the setData templating helper. This helper allows you to update the content of a data bucket, push a new value to an array, delete a property, increment or decrement a number, or invert a boolean. It can be used anywhere templating helpers are supported and is a good complement to CRUD routes to create complex scenarios.
Copy<!-- Add a property to the target object --> <!-- Merge the target object with the request's body -->
Create a data bucket configuration route
Data buckets containing request helpers will only be generated during the first call to a route referencing them (directly or using them through the helpers). It allows you to create a configuration route for your bucket that you can use once to generate the bucket's content.
Let's say we have a route GET /users linking to a data bucket containing the following content:
Copy[
  {{# repeat (queryParamRaw 'total') }}
  {
    "{{queryParamRaw 'firstKey'}}": "{{faker (queryParamRaw 'firstValue')}}",
    "{{queryParamRaw 'secondKey'}}": "{{faker (queryParamRaw 'secondValue')}}"
  }
  {{/ repeat }}
]
After starting the mock server, we can call the following endpoint:
GET http://localhost:3001/posts1?firstKey=firstName&firstValue=person.firstName&secondKey=email&secondValue=internet.email&total=10
The queryParamRaw helper will retrieve the values passed in the query string, and your bucket will be generated accordingly. Here, we choose to generate 10 items, with a first name and an email. We could then get this kind of content after subsequent calls to routes using the data bucket:
Copy[
  { "firstName": "Anastasia", "email": "[email protected]" },
  { "firstName": "Camilla", "email": "[email protected]" },
  { "firstName": "Maya", "email": "[email protected]" },
  { "firstName": "Demario", "email": "[email protected]" },
  { "firstName": "Viola", "email": "[email protected]" },
  { "firstName": "Okey", "email": "[email protected]" },
  { "firstName": "Mertie", "email": "[email protected]" },
  { "firstName": "Stella", "email": "[email protected]" },
  { "firstName": "Nicola", "email": "[email protected]" },
  { "firstName": "Hailey", "email": "[email protected]" }
]
You might also be interested in these tutorials
Record API requests and HTTP traffic and auto-mock endpoints
Learn how to record entering API requests and HTTP traffic and auto-mock your endpoints with Mockoon
Read moreSimulate webhooks and callbacks in your mock API server
Learn how to simulate webhooks or callbacks in your mock API server to test your application's behavior when receiving asynchronous events from third-party services or APIs.
Read moreCreate a partial mock API with Mockoon's proxy mode
Learn how to create partial mocks of existing APIs with Mockoon's proxy mode in three easy steps
Read more