Use global variables to save the state between requests
Use global variables to save the state between requests and simulate complex workflows and scenarios in your mock API.
In this tutorial, we will learn how to use the global variables to save the state between requests in Mockoon. Global variables are a powerful feature that allows you to store and reuse data across multiple requests, contrarily to local variables, scoped to a template. It can be useful when you simulate complex workflows like user authentication, shopping carts, or any other scenario where you save data between requests.
Scope and support
Global variables are available everywhere templating helpers are supported: response body, rules, etc.
💡 While you can use global variables in data buckets, keep in mind that bucket content will be generated when the server starts, when global variables are not yet set.
Once set, global variables are shared between all routes of an environment and available during all requests. Their values are reset when the environment is stopped or restarted.
⚠️ These variables are not shared between environments.
1. Set a global variable
To set a global variable, you can use the setGlobalVar templating helper. This helper takes two arguments: the variable name and its value. You can dynamically set the parameters using other helpers.
Some examples:
Copy<!-- Setting a simple variable --> <!-- Getting the value from the request body --> <!-- Getting the name and value from a query parameter and the request body -->
2. Get a global variable
To get a global variable, you can use the getGlobalVar templating helper. This helper takes two arguments: the variable name and an optional path. Here too, you can dynamically set the parameters using other helpers and you can use the fetched data in other helpers.
Some examples:
Copy<!-- Getting a variable --> <!-- Getting a variable content's properties using the JSONPath syntax --> <!-- Getting the name of the variable from the request body --> <!-- Using the variable content in an each helper (if the content is an array) --> ... <!-- Stringify the variable content -->
📘 Head over to the global variables documentation where you will find more examples.
3. Clear the global variables
To clear all the global variables, use the PURGE /mockoon-admin/global-vars or POST /mockoon-admin/global-vars/purge endpoints from the admin API.
4. An example use case: user authentication
Let's see how to use global variables to simulate a simple user authentication workflow. We will create two routes: one to log in and one to get the user's profile. We will use a global variable to store a boolean value indicating if the user is authenticated.
Create the login route
First, create a new route POST /login to simulate a user logging in. Set the route with the following settings:
-
Method: POST
-
Path:
login -
Response body:
Copy{{setGlobalVar 'isAuthenticated' true}}

{
  "message": "Login successful"
}
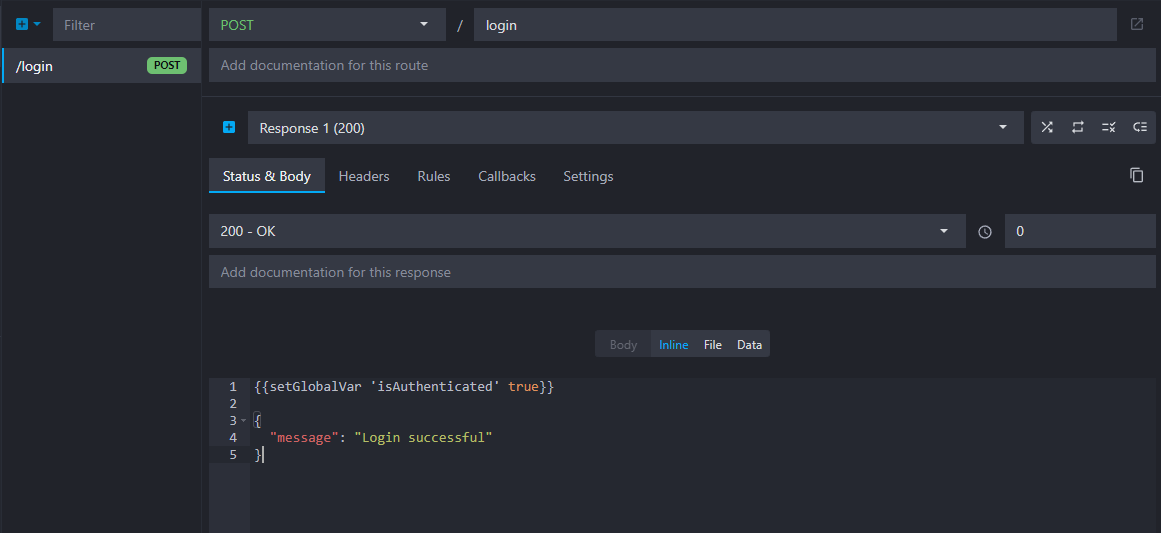 Overview of the login route with status 200 and "successful" body
Create the profile route
Then, create a new GET /profile route to simulate retrieving a user profile. For this route, we will check if the user is authenticated before returning the profile using two responses and a rule.
First, create a new HTTP route and set the following settings:
-
Method: GET
-
Path:
profile -
Status: 401
-
Response body:
Copy{
  "message": "Unauthorized"
}
This will be our default response when the user is not authenticated. You can set the status to 401 to indicate that the user is not authorized to access the resource.
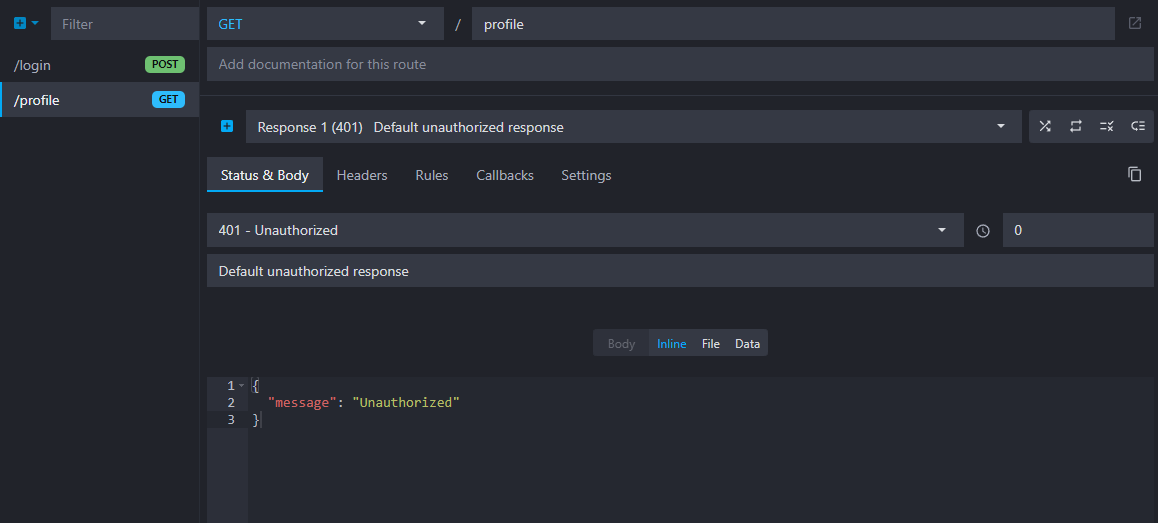 Overview of the profile route with status 401 and "unauthorized" body
📘 Head over to the related documentation to learn more about creating multiple responses and the default route response.
Then, add a new response by clicking on the "plus" button next to the response list:

Set the following settings to the new response:
-
Status: 200 (it should be the default)
-
Response body, generating a fake user profile:
Copy{
  "name": "{{faker 'person.firstName'}} {{faker 'person.lastName'}}",
  "email": "{{faker 'internet.email'}}",
  "address": "{{faker 'address.streetAddress'}}",
  "phone": "{{faker 'phone.number'}}"
}
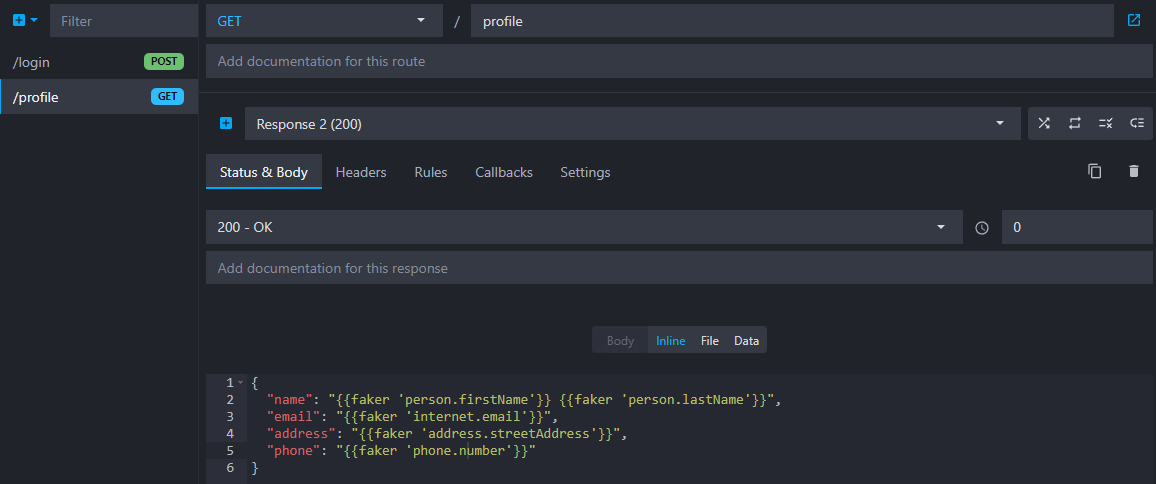 Overview of the profile route second response with status 200 and fake profile
Add a rule to check if the user is authenticated
At this stage, we have two responses for the GET /profile route:
- The first one with a status of 401 indicates that the user is not authenticated. It should be the default response marked with a blue flag in the response list.
- The second one, with a status of 200 returns the user profile. It should be the second response in the list.
If you test the route now by making a GET call to /profile, you will always receive the 401 response because this is the default response, and there is no rule to check if the user is authenticated yet.
 The responses list
To enable the user to access the profile only if they are authenticated (i.e. the /login route was called, and the global variable isAuthenticated is true), we need to add a rule on the second response to check the value of the global variable isAuthenticated.
To add the rule, first click on the second response in the list to edit it and click on the "Rules" tab:
 The response rules tab
Finally, add a new rule to the route to check if the user is authenticated. Click on the "plus" button in the rules list and set the following settings:
- Target "Global variable"
- Variable name:
isAuthenticated - Operator "equals"
- Value:
true
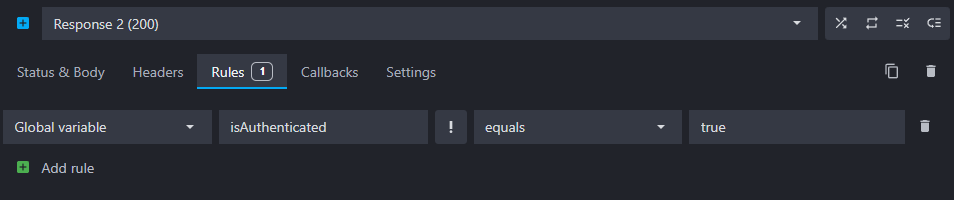 Overview of the new rule
📘 Head over to the rules documentation to learn more about creating rules in Mockoon .
Test the workflow
Now that we have set up the routes and the rule, you can test the workflow.
- Make a
GETcall to/profile. You should receive the 401 response with the "Unauthorized" message. - Make a
POSTcall to/login. You should receive the 200 response with the "Login successful" message. - Make a
GETcall to/profileagain. This time, you should receive the 200 response with the fake user profile.
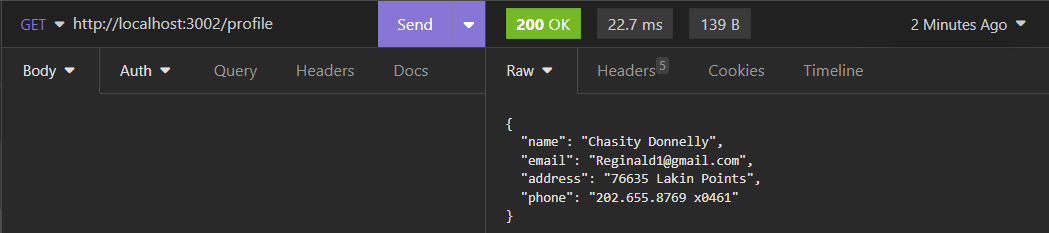 Overview of the profile route with status 200 and fake profile
To reset the global variable isAuthenticated between tests, you can restart the mock API.
You might also be interested in these tutorials
Advanced data bucket manipulation with setData
Learn how to build stateful mock APIs with Mockoon's setData helper using advanced API key rotation, usage tracking, login, and lockout scenarios.
Read moreGetting started with Mockoon Cloud
Learn how to get started with Mockoon Cloud, a cloud-based service that allows you collaborate on your mock APIs with your team
Read moreUse global variables to save the state between requests
Use global variables to save the state between requests and simulate complex workflows and scenarios in your mock API.
Read more