
Implement rate limiting with custom templates and rules
Learn how to implement rate limiting in your Mockoon APIs using custom templates and rules to control request frequency and protect your endpoints
In this tutorial, we will learn how to implement rate limiting in your Mockoon APIs using custom templates and rules to control request frequency and protect your endpoints from abuse.
Rate limiting is a crucial technique used to control the number of requests a client can make to an API within a specific time window. It helps prevent abuse, ensures fair usage, and protects your API from being overwhelmed.
In Mockoon, you can implement rate limiting using global variables to track request timestamps and counters, combined with template helpers and response rules to enforce the limits.
Let's explore different approaches to implement rate limiting, from simple time-based limits to more complex quota systems.
💡 This tutorial assumes you are familiar with the basics of Mockoon, like creating endpoints and using templates. If you are new to Mockoon, you can check the other tutorials to get started.
⚠️ This tutorial requires v9.4.0 or later of Mockoon. You can download the latest version of Mockoon here.
1. Simple time-based rate limiting with templates
The simplest form of rate limiting is to limit requests based on time intervals. We'll create an endpoint that allows only one request every 500 milliseconds.
Create a new endpoint
First, let's create a new HTTP GET route with the path /rate-limited:

Add the rate limiting template
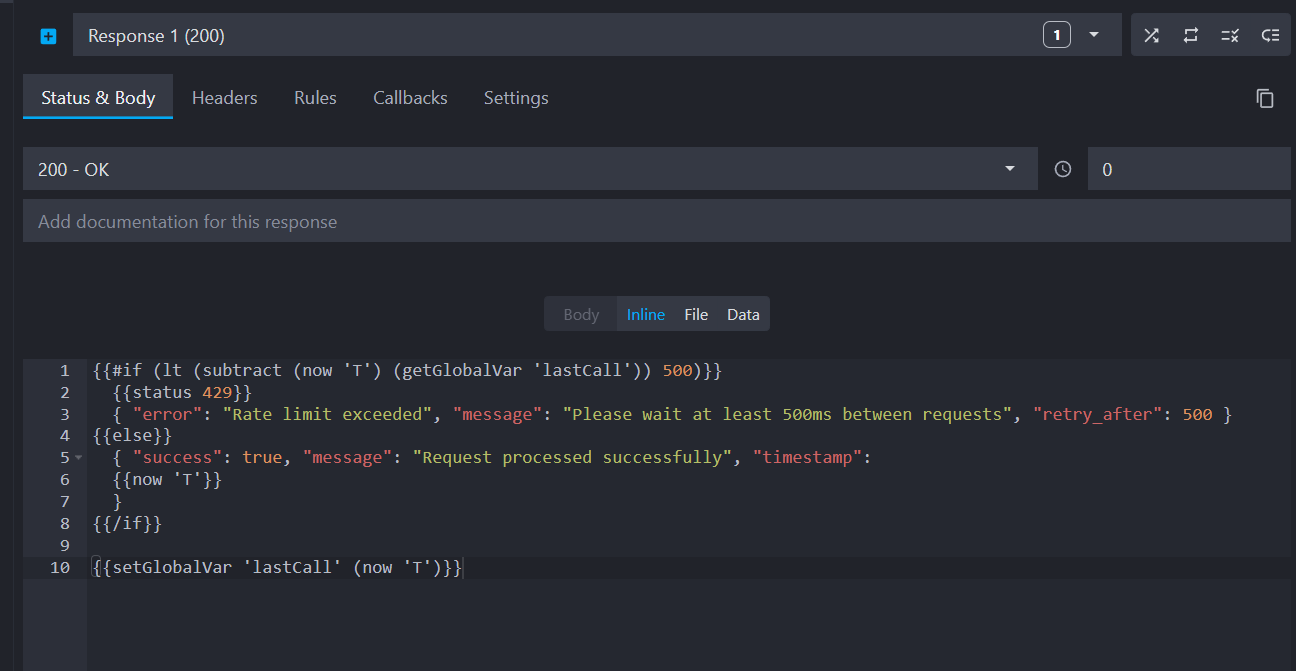
In the response body, add the following template that implements time-based rate limiting:
Copy{ "error": "Rate limit exceeded", "message": "Please wait at least 500ms between requests", "retry_after": 500 } { "success": true, "message": "Request processed successfully", "timestamp": }
This template uses our templating engine and does the following:
- Checks the time difference between the current request and the last request using the following helpers:
lt,subtract,nowandgetGlobalVar. - Returns a 429 status (Too Many Requests) if the interval is less than 500ms using the
statushelper. - Updates the timestamp for the next request using the
setGlobalVarhelper. - Provides helpful information about the rate limit in the JSON response.
2. Rule-based rate limiting with multiple responses and a rule
For more complex scenarios, you can use response rules to serve different responses based on rate limiting conditions. The following example will use the same template as above but will use a response rule instead of conditional templating.
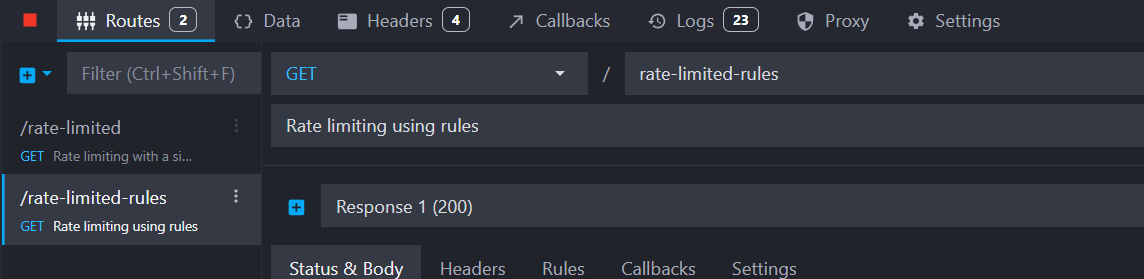
Create a new endpoint with multiple responses
Create a new HTTP GET route with the path /rate-limited-rules:
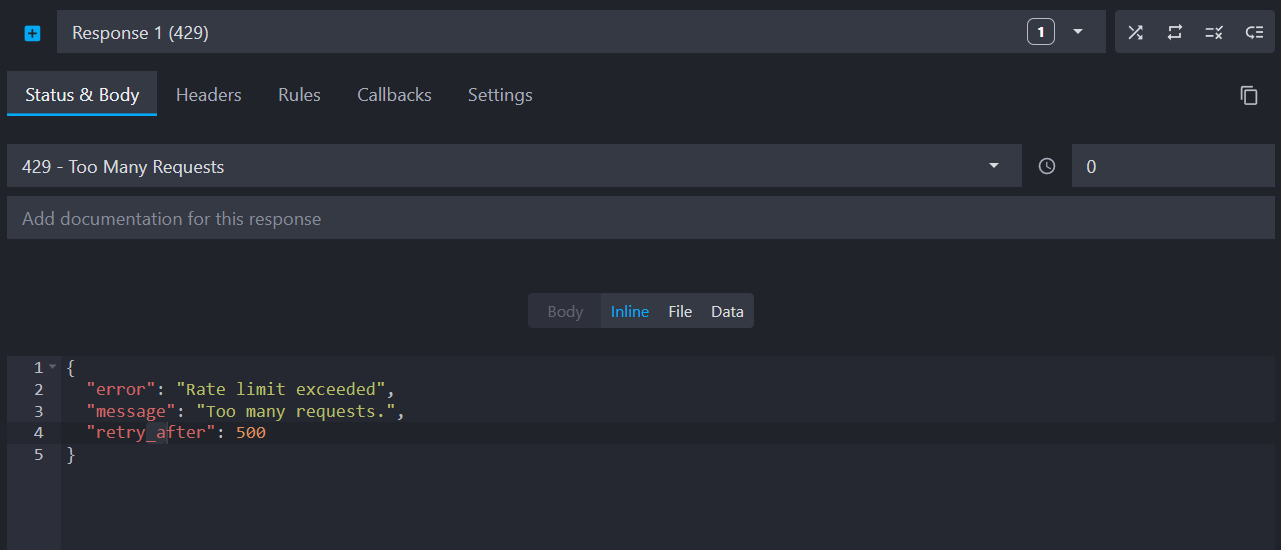
Add the default rate-limited response
The default response will handle rate-limited requests with a 429 status code and the following JSON body:
Copy{
  "error": "Rate limit exceeded",
  "message": "Too many requests.",
  "retry_after": 500
}
Set the status code to 429 for this response:
Add a successful response with rate limiting rule
Add a new response by clicking the "Add response" button. Set the status code to 200 and add the following successful response JSON body:
Copy{
  "success": true,
  "message": "Request processed successfully"
}
Now, click the "Rules" tab and add a "Custom templating" rule to check if enough time has passed since the last request. Custom rules allow you to define a target value to be evaluated using our templating engine. In the rule target field, enter:
Copy
Then, set the rule value to true. This target will evaluate to true if at least 500 milliseconds have passed since the last request.
Similarly to the previous template, this rule does the following:
- Checks if 500ms or more have passed since the last call using the following helpers:
gte,subtract,nowandgetGlobalVar. - Updates the timestamp when the condition is met using the
setGlobalVarhelper. - Only serves the 200 response when the template evaluates to
true.

3. Testing your rate limiting implementations
To test your rate limiting, start your mock API server and use your favorite HTTP client to send multiple requests in quick succession.
Testing the simple time-based limit
Send multiple GET requests to GET /rate-limited or GET /rate-limited-rules quickly:
Copycurl -X GET http://localhost:3000/rate-limited
You should see:
- First request: Success response (200)
- Immediate second request: Rate limited response (429)
- Request after 500ms: Success response (200)
4. Advanced quota-based rate limiting
For more sophisticated rate limiting, let's implement a quota system that allows a configurable number of requests per time period.
Create a data bucket for configuration
First, create a new data bucket to store the rate limiting configuration. Data buckets allow you to store and manage JSON data that can be accessed and manipulated in your templates and rules.
Go to the "Data" view, click "Add data", name it "rate_config" and add the following configuration:
Copy{
  "last_request_timestamps": [],
  "max_requests_per_seconds": 2
}
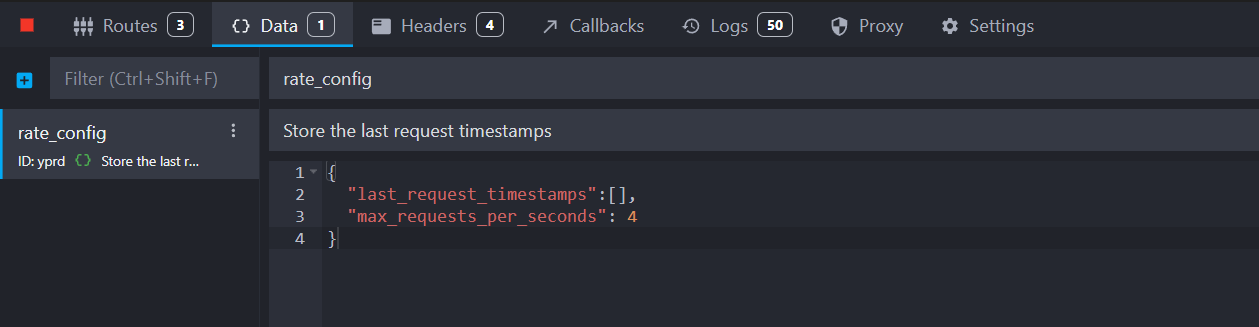
This configuration allows 2 requests per second and will be used to track the timestamps of the last requests in the last_request_timestamps array.
Create the quota-limited endpoint
Create a new HTTP GET route with the path /quota-limited:
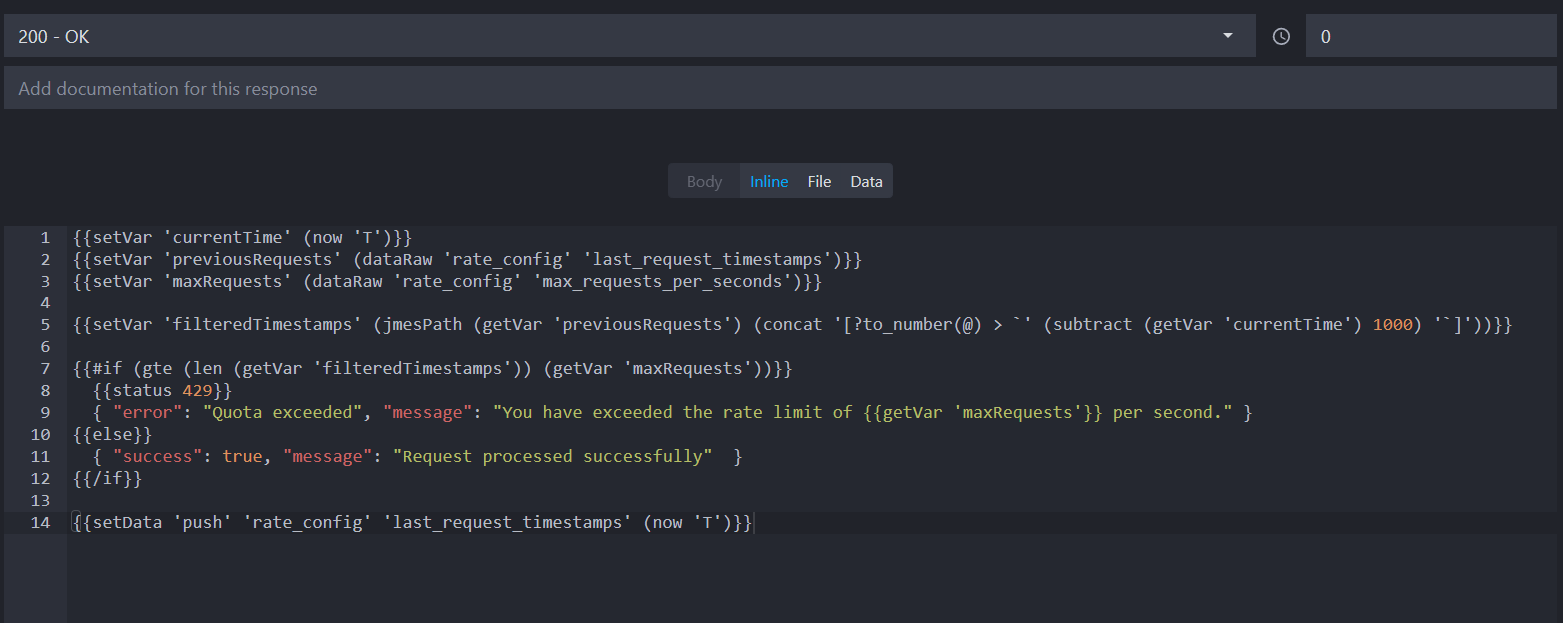
Add the following advanced template to implement quota-based rate limiting:
Copy{ "error": "Quota exceeded", "message": "You have exceeded the rate limit of per second." } { "success": true, "message": "Request processed successfully" }
This template does the following:
- Saves the current time and retrieves the previous request timestamps and the maximum requests per second from the
rate_configdata bucket using thedataRaw,setVarandnowhelpers. - Filters the timestamps to only include those within the last second using the
jmesPathhelper. - Checks if the number of requests in the last second exceeds the configured limit using the
lenandgtehelpers. - Returns a 429 status (Too Many Requests) if the limit is exceeded, providing a detailed error message.
- Pushes the last request timestamps in the
rate_configarray using thesetDatahelper.
Testing the quota-based limit
Send multiple GET requests to /quota-limited:
Copycurl -X GET http://localhost:3000/quota-limited
You should see a 429 response if you exceed the configured limit of 2 requests per second. The response will include information about the number of requests allowed.
Going further
After completing this tutorial, you can enhance your rate limiting implementation by:
-
rate limiting based on user IP or other request attributes by storing request timestamps in a user-specific data bucket property, using the
headerorqueryParamhelpers. -
Implementing more complex quota systems with different limits for different endpoints using a
request path ruleto serve different rate limits based on the request path.
By following this tutorial, you have learned how to implement rate limiting in Mockoon using custom templates and rules. You can now control request frequency, protect your APIs from abuse, and ensure fair usage across your endpoints. Experiment with different configurations and explore the flexibility of Mockoon's templating system to suit your specific rate limiting needs.
Download the example environment
You can download the example environment file created for this tutorial or directly open it in Mockoon desktop or CLI:
You might also be interested in these tutorials
Serve static files with a custom mock endpoint
Learn how to create an endpoint to serve static files (images, fonts, etc.) in your mock API server using Mockoon
Read moreUse global variables to save the state between requests
Use global variables to save the state between requests and simulate complex workflows and scenarios in your mock API.
Read moreRecord API requests and HTTP traffic and auto-mock endpoints
Learn how to record entering API requests and HTTP traffic and auto-mock your endpoints with Mockoon
Read more