Self-host your mock APIs with Mockoon CLI
Learn how to create mock REST APIs and self-host them in all headless and server environments with Mockoon CLI
Mockoon CLI is a companion application to Mockoon's main desktop application. It allows you to run your mock APIs on your servers, CI/CD environments, or any headless environment where you can't run the main application. This tutorial will guide you through the process of running your mock APIs with the CLI and its Docker image.
📘 To learn more about APIs and API mocking in general, head over to our API guide or API mocking guide
What is Mockoon CLI?
Mockoon CLI is an NPM package that can run on all environments where Node.js is installed. A Docker image and a GitHub Action are also available (see below).
How to use the CLI?
After designing your mock API in the main application, the CLI will be able to consume the data file and run the mock API on your server.
Step 1. Create a mock API using Mockoon desktop
One of the prerequisites for using the CLI is to create a mock API in the main application. If you already have a setup in Mockoon desktop, you can jump straight to the next section. If not, you can download the latest version of the application from the download page and follow the "Getting started tutorial" to create your first mock API.
Step 2. Install the CLI
Before using your mock API in the CLI, you must install it. First, ensure that Node.js is installed on your computer by running node -v in your terminal:
Copy$ node -v
v20.0.0
If Node.js is not installed on your computer, head over to Node.js' download page and follow the instructions for your operating system.
You are now ready to install the CLI by running the following command npm i -g @mockoon/cli:
Copy$ npm i -g @mockoon/cli

+ @mockoon/[email protected]
added 234 packages in 6s
You can also install Mockoon CLI in the scope of a local project by running npm i @mockoon/cli. You will then need to use NPM scripts or npx mockoon-cli ... to execute the CLI commands.
💡A note about Mockoon versions: all our applications are released with the same version number. This makes it easier to understand which version of the CLI is compatible with the desktop application (learn more).
Step 3. Prepare your data file
Mockoon CLI can run your mock API in two ways: by providing a Mockoon's environment file (data file) or an OpenAPI specification file.
Provide a Mockoon's environment file
The CLI can directly run data files created by the main application, including from older versions. If an older version is detected, the CLI will automatically migrate the data file content to the latest version while keeping the original file intact. The migration process is non-destructive and only happens in memory.
However, the CLI is not able to run a data file from a more recent version. You will need to update the CLI to the latest version to run the latest data files.
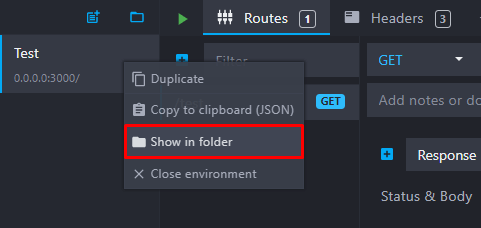
You can run your mock in one single step by providing the actual location of your Mockoon environment file. To locate your environment file from the main application, click the three dots next to the environment name and select "Show data file in explorer/finder" in the dropdown menu:
For the rest of this tutorial, we will pretend that your data file is named data.json and resides in the current directory.
💡 As an alternative, you can also provide a URL pointing to a Mockoon environment file, and Mockoon CLI will take care of downloading it.
Use an OpenAPI specification file
Another option is to directly pass an OpenAPI specification file. It's particularily useful to quickly run a mock API from a publicly available specification. Mockoon supports both JSON and YAML formats in versions 2.0.0 and 3.0.0. We also offer thousands of ready-to-use OpenAPI specifications in our mock samples directory.
As above, you can provide a path to a local OpenAPI specification file or directly the file's URL.
⚠️ There is currently no equivalent between some of the Mockoon's features and the OpenAPI specifications (more info). If you want to run your mock API created in Mockoon in the CLI with all its features (rules, etc.), you must use Mockoon's data file (see above) and not the OpenAPI export feature.
Step 4. Start you mock API
After locating your environment file, you are ready to run your API mock with the CLI.
In your terminal, navigate to the folder where your Mockoon's data file or OpenAPI file is and run the following command:
mockoon-cli start --data ./data.json
Or:
mockoon-cli start --data ./openapi-spec.yaml
If you want to use a remotely hosted files, you can also provide a URL to the --data flag like this:
mockoon-cli start --data https://domain.com/data.json
Multiple flags are available to customize the behavior of the CLI, including:
--port: to override the port on which the mock API will listen.--hostname: to override the hostname on which the mock API will listen.--log-transaction: Log the full HTTP transaction (request and response).--enable-random-latency: Randomize global and responses latencies between 0 and the specified value.--disable-admin-api: Disable the admin API, enabled by default.
You will find more information regarding the start command, including all the available flags on the official repository.
Your mock API will then be available on localhost and on the port you specified (e.g. http://localhost:3000) and running as a foreground process:
Copy$ mockoon-cli start --data ./data.json --port 3000
{"level": "info", "environmentName":"Demo API", "message":"Server started on port 3000"}
{"level": "info", "environmentName":"Demo API", "message":"Transaction recorded", "requestMethod":"GET", "requestPath":"/test", "responseStatus":200}
It's also possible to run multiple mocks at the same time by providing multiple data files and ports:
Copy$ mockoon-cli start --data ./data1.json ./data2.json https://example.com/data3.json --port 3000 3001 3002
{"level": "info", "environmentName":"Demo API 1", "message":"Server started on port 3000"}
{"level": "info", "environmentName":"Demo API 2", "message":"Server started on port 3001"}
{"level": "info", "environmentName":"Demo API 3", "message":"Server started on port 3002"}
Step 5. View a running mock's logs
In addition to stdout (console), Mockoon CLI logs all events like requests and errors in your user folder in the following file: ~/.mockoon-cli/logs/{mock_name}.log.
This file contains all the log entries (all levels) produced by the running mock server. Most errors occurring in Mockoon CLI (or the main application) are not critical and, therefore, considered normal output. As an example, if the JSON body from an entering request is erroneous, Mockoon will log a JSON parsing error, but it won't block the normal execution of the application.
💡 File logging is disabled where running Mockoon CLI using our Docker image. You can also disable it with the --disable-log-to-file flag.
In addition, the logs can be available through the Admin API, which is enabled by default and exposed in each running mock on the /mockoon-admin path. You can make a GET request to http://localhost:3000/mockoon-admin/logs to retrieve the logs. The information available through the Admin API is the same as the one available in the Desktop application's "Logs" tab.
Step 6. Deploy Mockoon CLI using Docker
Using the generic Docker image published on Docker Hub
A generic Docker image mockoon/cli is automatically built upon each release on Docker Hub's Mockoon CLI repository. It uses a node-alpine image and installs the latest version of Mockoon CLI.
All mockoon-cli start flags (--port, etc.) must be provided when running the container.
To load a data file, you can either mount a local file and pass the start command flags at the end of the command:
docker run -d --mount type=bind,source=/home/your-data-file.json,target=/home/mockoon/data/your-data-file.json,readonly -p 3000:3000 mockoon/cli:latest --data /home/mockoon/data/your-data-file.json --port 3000
Or directly pass a URL to the mockoon-cli start command:
docker run -d -p 3000:3000 mockoon/cli:latest -d https://raw.githubusercontent.com/mockoon/mock-samples/main/samples/generate-mock-data.json -p 3000
Using the dockerize command
Mockoon CLI also offers a dockerize command that allows you to build a self-contained image. This command copies all the environment data files and generates a Dockerfile. After building the image, no Mockoon CLI-specific parameters will be needed at runtime.
Run the dockerize command with the data files and ports you want to expose and specify the output folder where the Dockerfile will be generated:
mockoon-cli dockerize --data ./data1.json ./data2.json --port 3000 3001 --output ./tmp/Dockerfile
Then, navigate to the output folder, here tmp, where the Dockerfile has been generated, and build the image:
docker build -t mockoon-image .
You can finally run your container:
docker run -d -p 3000:3000 -p 3001:3001 mockoon-image
Step 7. Use Mockoon CLI in a CI environment: GitHub Actions
Mockoon CLI, being a JavaScript application, can run on any environment where Node.js is installed, including continuous integration systems like GitHub Actions or CircleCI. It is useful when you want to run a mock server while running integration tests on another application. For example, you could mock an API when running a React front-end application test.
We published a GitHub Action, named mockoon/cli-action@v2, that allows you to run Mockoon CLI in your GitHub Actions workflows.
Several parameters are available to customize the behavior of the action, including the version of the CLI (default to latest), the data-file path pointing to a file located in the repository, and the port.
Here is an example of a GitHub Action running a mock API before running some tests:
Copyname: Run mock API server
on:
  push:
    branches:
      - main

jobs:
  test:
    runs-on: ubuntu-latest

    steps:
      - uses: actions/checkout@v3
      - name: Use Node.js
        uses: actions/setup-node@v3
        with:
          node-version: 18
      - name: Start Mockoon CLI
        uses: mockoon/cli-action@v2
        with:
          # Mockoon CLI version, default to 'latest'
          version: 'latest'
          # Mockoon local data file or URL
          data-file: './data.json'
          # port, default to 3000
          port: 3000
      - name: Make test call
        run: curl -X GET http://localhost:3000/endpoint
      - name: Run tests
        run: npm run test
💡 If you are building your own GitHub Actions with the CLI, do not forget to add an & at the end of the start command to run it in the background: mockoon-cli start -d ./data-file.json &.
You might also be interested in these tutorials
Record API requests and HTTP traffic and auto-mock endpoints
Learn how to record entering API requests and HTTP traffic and auto-mock your endpoints with Mockoon
Read moreGenerate dynamic mock data with Mockoon templating system
Learn how to generate dynamic JSON, CSV or XML realistic mock data with Mockoon powerful templating system and helpers
Read moreServe static files with a custom mock endpoint
Learn how to create an endpoint to serve static files (images, fonts, etc.) in your mock API server using Mockoon
Read more