
Call a mock REST API from your Nuxt project
Learn how to call a REST API server from your Nuxt project and mock it using Mockoon API mocking tools
This tutorial will detail step by step how to call a REST API from a Nuxt project created with the create-nuxt-app scaffolding tool. If you already have an existing API that you want to call from your application, you can skip the first step, in which we will create a fake REST API using Mockoon to speed up the development.
1. Create a mock API endpoint with Mockoon
When working on your Nuxt application, you may need to mock an API that is still under development, or that is only partially available. The easiest way to start working without having to wait is to create a mock API using a tool like Mockoon. (Read more about the benefits of API mocking).
To learn more about how to set up your first mock API with Mockoon, head over to the Getting started tutorial.
For the rest of the tutorial, we will use an array of fake blog posts with a single title. In Mockoon, create a GET /posts API route that returns an array of blog posts:
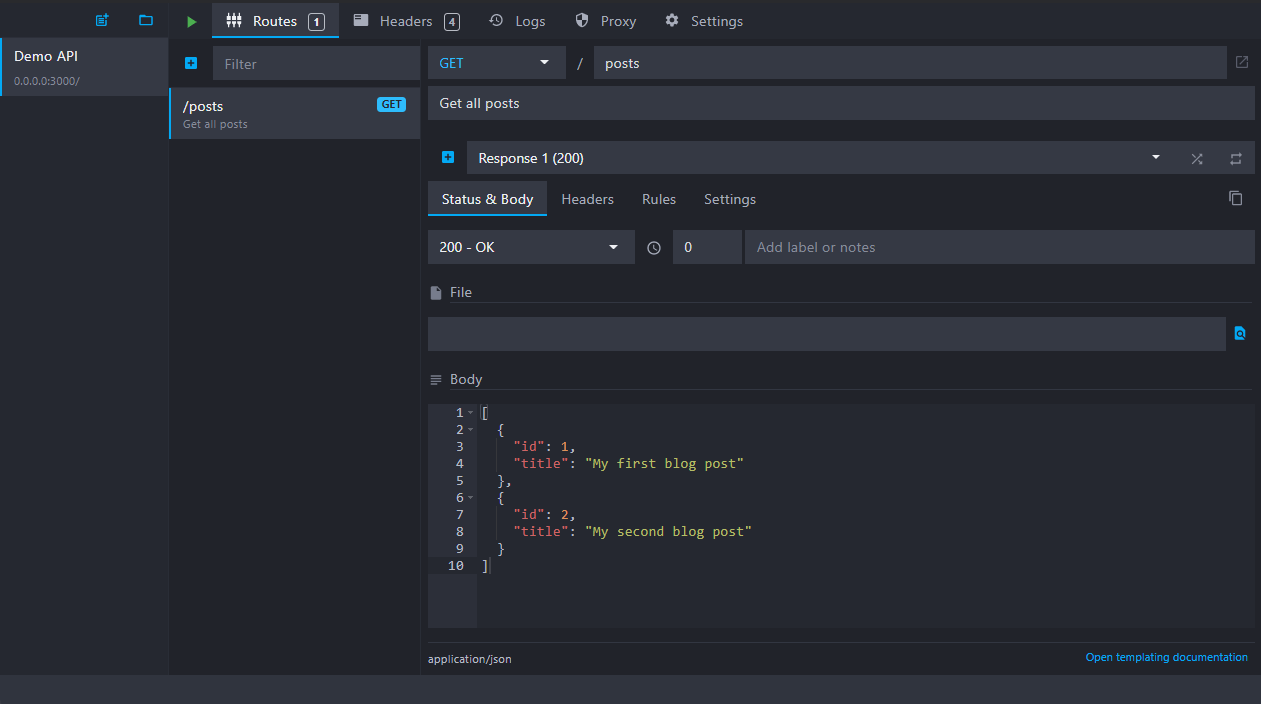
You can use the following JSON as the body returned by the endpoint:
Copy[
  {
    "id": 1,
    "title": "My first blog post"
  },
  {
    "id": 2,
    "title": "My second blog post"
  }
]
Note that your fake mock API server will be available at the following URL: http://localhost:3000. It is the URL we will need to use in our Vue.js component.
2. Preparing our Vue.js component
For this tutorial, we created a new Nuxt project using the official scaffolding tool: npx create-nuxt-app my-project. We answered "no" to most questions to keep the setup simple.
In the rest of this guide, we will use the main ./pages/index.vue file that was automatically created.
First, let's "clean" this page component a bit by removing the Tutorial component:
Copy<template>
  <!-- Removed tutorial component -->
</template>

<script>
  export default {
    name: 'IndexPage'
  };
</script>
3. Make a call to the API endpoint in your component
After preparing our ./pages/index.vue page and creating a mock REST API endpoint in Mockoon, you can now call it from your component's code.
To make an AJAX call to an API, we need to use a library or the browser's built-in window.fetch function. We will be using the fetch function as it is available in most browsers.
You will find below the minimal code needed to call our API route with this function:
Copyfetch('http://localhost:3000/posts')
  .then((res) => res.json())
  .then((posts) => {
    // we received our list of posts
    console.log(posts);
  });
We need to integrate this code into our index page. However, we need to first prepare the initial reactive state (data) for our posts, and a created method using Vue's Options API, in which we will fetch our data at component's creation time.
Copy<script>
  export default {
    data() {
      return {
        posts: []
      };
    },
    created() {
      // we will fetch our posts here, when the component is created
    }
  };
</script>
4. Fetch the data and store the result in the reactive state
We can now add our fetch function to the created method and store the result in the component's state:
Copy<script>
  export default {
    data() {
      return {
        posts: []
      };
    },
    created() {
      fetch('http://localhost:3000/posts')
        .then((res) => res.json())
        .then((posts) => {
          // store the posts in the reactive state
          this.posts = posts;
        });
    }
  };
</script>
5. Use the posts state variable in your component's template
We can now render our blog posts on the page as <li> using a v-for directive:
Copy<template>
  <ul>
    <li v-for="post in posts" :key="post.id">{{ post.title }}</li>
  </ul>
</template>
Putting all this code together, we get a fully functional component loading asynchronous mock data:
Copy<script>
  export default {
    data() {
      return {
        posts: []
      };
    },
    created() {
      fetch('http://localhost:3000/posts')
        .then((res) => res.json())
        .then((posts) => {
          // store the posts in the reactive state
          this.posts = posts;
        });
    }
  };
</script>

<template>
  <ul>
    <li v-for="post in posts" :key="post.id">{{ post.title }}</li>
  </ul>
</template>
You might also be interested in these tutorials
Create multiple route responses with dynamic rules
Learn how to create multiple responses for an API endpoint and serve them using dynamic rules
Read moreSimulate webhooks and callbacks in your mock API server
Learn how to simulate webhooks or callbacks in your mock API server to test your application's behavior when receiving asynchronous events from third-party services or APIs.
Read moreServe static files with a custom mock endpoint
Learn how to create an endpoint to serve static files (images, fonts, etc.) in your mock API server using Mockoon
Read more