
Create your first Java Spring API (or mock it using Mockoon!)
Learn how to create your first REST API and endpoints with java Spring framework or mock it using Mockoon to accelerate your application development
In this tutorial, you will learn how to create a basic REST API using Java's Spring framework. Spring is one of the most popular Java frameworks for web applications development and REST API creation.
Before continuing, you can learn more about REST APIs in general, how they work, their components, etc. in our series of tutorials
Creating an API using this framework is easy, straightforward, and only requires the following basic steps.
1. Verify that the JDK is installed
To create a simple API using Spring, we first need to verify that the JDK is installed by running the following command:
Copy$ javac -version
javac 18.0.1
Go to Oracle's website to install the JDK if the above command is unsuccessful.
2. Generate a new application with Spring Initializr
To speed up development, we can use Spring's own application generator called Spring Initializr to generate a new application with all the configuration needed to create an API. Please note that we are adding Spring Web as a dependency which contains all the needed libraries to create web applications and APIs. We didn't modify any other options except the Java version (18).
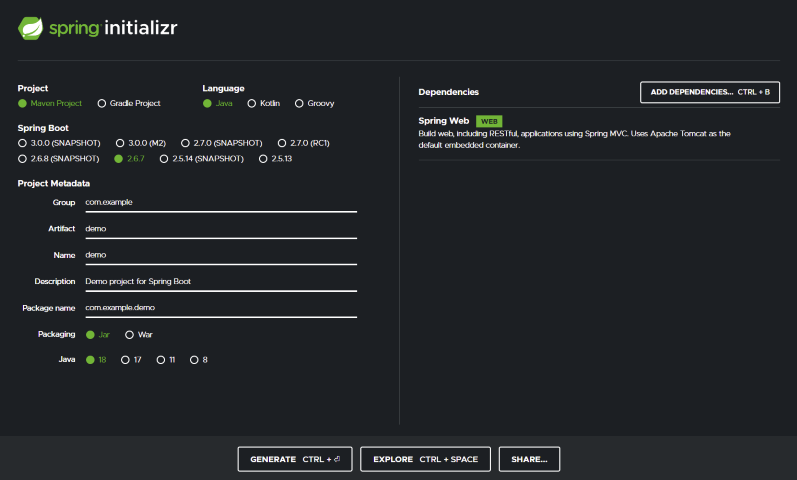
After clicking on the "Generate" button, the generator will download a zip file containing a new project. Extract it, and open the project with your favorite IDE (IntelliJ, Eclipse, etc.).
3. Add a new Spring controller
To be able to add routes to our new API, we first need to create a new controller. To do so, create a new 'UsersController.java' file in your ./src/main/java/com/example/demo folder.
In this file, we first need to use the same package name as the main DemoApplication.java file and import the relevant annotations, GetMapping and RestController:
Copypackage com.example.demo;

import org.springframework.web.bind.annotation.RestController;
We can then create a new UsersController class to handle our /users routes:
Copypackage com.example.demo;

import org.springframework.web.bind.annotation.RestController;

@RestController
public class UsersController {

}
The class needs to be annotated with @RestController. It allows Spring to use our class as a web requests handler.
3. Add API routes and return JSON data
We are now ready to add API routes to our controller by adding methods and Spring annotations. There are annotations for each type of HTTP method, @GetMapping, @PostMapping, etc.
Copypackage com.example.demo;

import org.springframework.web.bind.annotation.GetMapping;
import org.springframework.web.bind.annotation.DeleteMapping;
import org.springframework.web.bind.annotation.RestController;

@RestController
public class UsersController {
  @GetMapping("/users")
  public String getUsers() {
    return "Get users";
  }

  @DeleteMapping("/users")
  public String deleteUser() {
    return "Delete a user";
  }
}
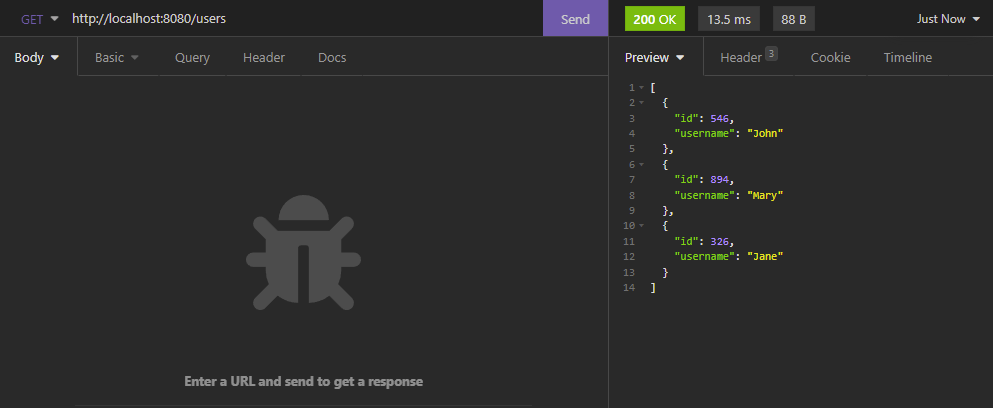
This code will enable calls to the /users API route for both the GET and DELETE HTTP methods and use respectively the getUsers and deleteUser methods to handle the requests on those routes. For now, our routes only return simple strings. Let's return a list of users from the GET /users route by adding a simple User class and modifying our getUsers method accordingly:
Copypackage com.example.demo;

import java.util.ArrayList;
import java.util.List;

import org.springframework.web.bind.annotation.GetMapping;
import org.springframework.web.bind.annotation.DeleteMapping;
import org.springframework.web.bind.annotation.RestController;

class User {
  public int id;
  public String username;

  public User(int id, String username) {
    this.id = id;
    this.username = username;
  }
}

@RestController
public class UsersController {
  @GetMapping("/users")
  public List<User> getUsers() {
    List<User> list = new ArrayList<User>();
    list.add(new User(546, "John"));
    list.add(new User(894, "Mary"));
    list.add(new User(326, "Jane"));
    return list;
  }

  @DeleteMapping("/users")
  public String deleteUser() {
    return "Delete a user";
  }
}
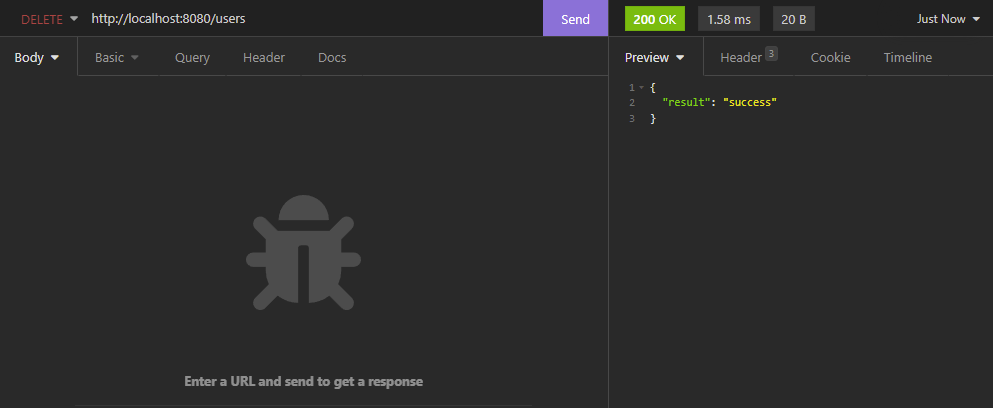
We can also return a JSON message from the DELETE /users route by returning a simple Map:
Copypackage com.example.demo;

import org.springframework.web.bind.annotation.GetMapping;

import java.util.ArrayList;
import java.util.Collections;
import java.util.List;
import java.util.Map;

import org.springframework.web.bind.annotation.DeleteMapping;
import org.springframework.web.bind.annotation.RestController;

class User {
  public int id;
  public String username;

  public User(int id, String username) {
    this.id = id;
    this.username = username;
  }
}

@RestController
public class UsersController {

  @GetMapping("/users")
  public List<User> getUsers() {
    List<User> list = new ArrayList<User>();
    list.add(new User(546, "John"));
    list.add(new User(894, "Mary"));
    list.add(new User(326, "Jane"));
    return list;
  }

  @DeleteMapping("/users")
  public Map<String, String> deleteUser() {
    return Collections.singletonMap("result", "success");
  }
}
Please note that Spring will automatically handle the JSON serialization of our lists and objects and send the correct Content-Type: application/json header.
Of course, this code is quite basic, and the two routes we created should probably load the list of users and delete users from a database before returning a result. But this is out of the scope of this small tutorial.
4. Run your web server
You can now run your new API server by running the following Maven command:
Copy$ ./mvnw spring-boot:run
...
[INFO] Building demo 0.0.1-SNAPSHOT
...
  .   ____          _            __ _ _
 /\\ / ___'_ __ _ _(_)_ __  __ _ \ \ \ \
( ( )\___ | '_ | '_| | '_ \/ _` | \ \ \ \
 \\/  ___)| |_)| | | | | || (_| |  ) ) ) )
  '  |____| .__|_| |_|_| |_\__, | / / / /
 =========|_|==============|___/=/_/_/_/
 :: Spring Boot ::                (v2.6.7)
...
2022-04-27 08:57:58.474  INFO 1736 --- [nio-8080-exec-1] o.s.web.servlet.DispatcherServlet: Completed initialization in 0 ms
Your API is available on http://localhost:8080. You can do a test call to the following API endpoints GET /users and DELETE /users using your favorite tool (here, Insomnia) and see the returned response:
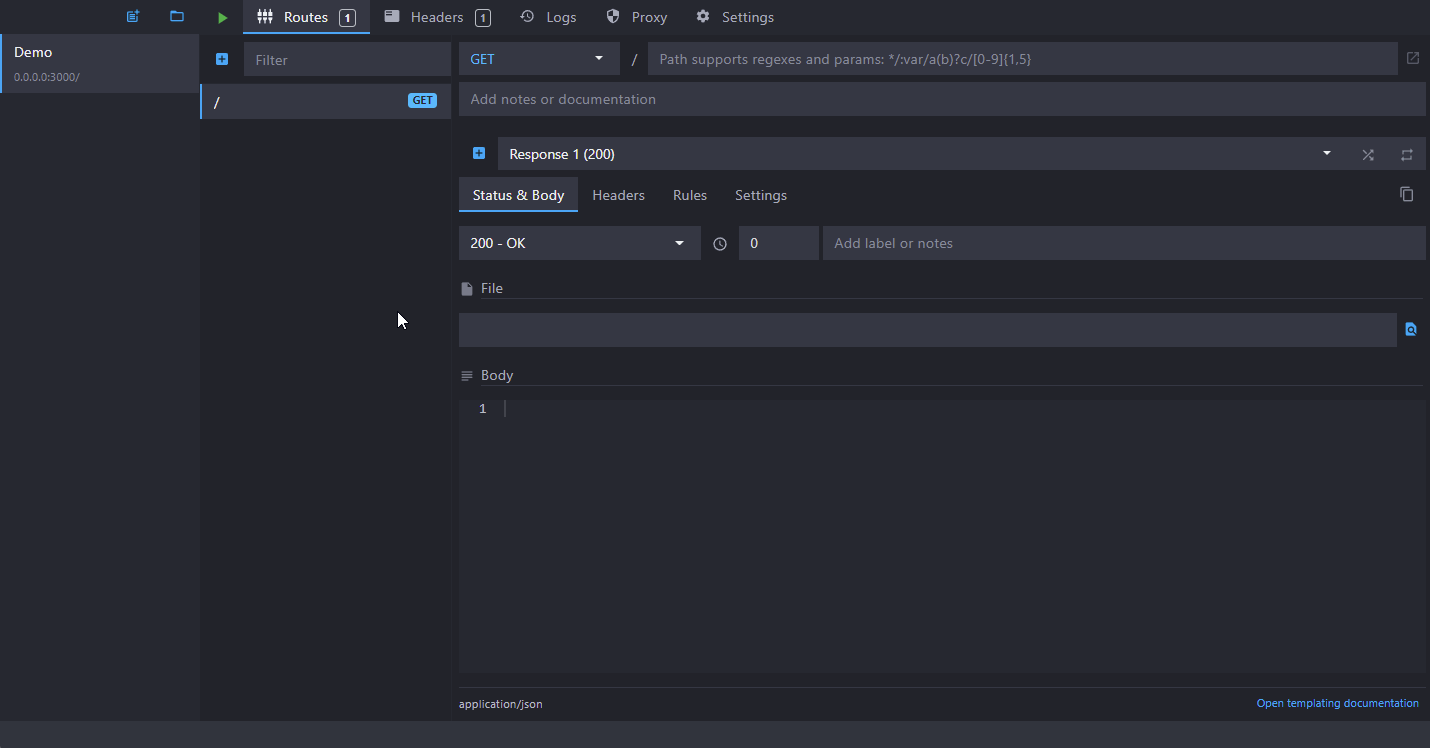
Speed up development with API mocking
Working with an API can be challenging. It could be unavailable for various reasons: the whole API is under development, some routes are missing, the documentation is outdated, the access is restricted to the production environment or behind a firewall, etc.
Instead of waiting for the API to be ready to be able to consume it, you could mock it using an API mocking tool like Mockoon.
API mocking is a technique that consists in imitating an unavailable API by simulating the endpoints and their responses. With this technique, you can have a running mock in no time and start calling it right away from your front-end or back-end application.
Mocking an API with Mockoon is easy and requires only some small steps to start working.
To learn more about setting up Mockoon and creating your first fake API in less than 5 minutes, head over to our getting start tutorial
 API mocking with Mockoon
You might also be interested in these tutorials
Generate dynamic mock data with Mockoon templating system
Learn how to generate dynamic JSON, CSV or XML realistic mock data with Mockoon powerful templating system and helpers
Read moreSimulate webhooks and callbacks in your mock API server
Learn how to simulate webhooks or callbacks in your mock API server to test your application's behavior when receiving asynchronous events from third-party services or APIs.
Read moreServe static files with a custom mock endpoint
Learn how to create an endpoint to serve static files (images, fonts, etc.) in your mock API server using Mockoon
Read more